Did you recently purchase a Cricut Maker and its troubleshooting already? The Cricut Maker not detecting blade is a very common problem faced by Cricut users which can be fixed easily if you follow the basic 5 steps that are mentioned below in the blog.
With some knowledge about your blade and the characteristics of the machine, we will make sure that the blade does not troubleshoot again and in case, if it does, then you’ll be educated enough about the machine to repair it yourself.
So, without delaying anymore, let’s hop on to some introduction about the machine and then the solution to fix the blade malfunction.
What is the Cricut Rotary blade?
The Cricut Rotary Blade is known to be one of the replaceable blades that are perfect with the Cricut Maker versatile instrument framework.
Like a hand-held rotator blade, this Cricut blade rolls and glides as it rapidly slices through up to three layers of the fabric you’re using, at once.
The ability of a Cricut Rotary blade of accurately and precisely cutting different types of the material makes it really unique. The Rotary Blade highlights noteworthy precision with its capacity to turn inside a fourth of an inch.
How Do I Resolve My Cricut Maker Not Detecting the Blade?
If you begin to notice that your blade isn’t piercing through materials perfectly, it’s an ideal opportunity to change the blade.
Apart from this, another major problem you may face while using the Cricut maker is that the blade is not detecting.
So, to resolve this problem manually, go through the steps mentioned below:
- First of all, make sure that the tool you installed in Clamp B coordinates the suggested tool by the Design Space in the Load tools step on the venture preview screen. On the off chance that you don’t have the suggested tool installed in Clamp B, then try unloading the mat in order to return to the project review screen. Right after returning to the project preview screen, select the Edit tools link in order to select another tool that is different from the previous one. Once you select and install the correct tool on Clamp B, then the issue endures and continues to stage
- After loading tools and mat, remove the instrument from Clamp B and clear off the reflective surface on the lodging. At that point, reinstall the instrument in Clamp B and press the Go button. In case that the issue continues then continue to stage 3.
- Even after stage 2 if the problem isn’t fixed, then try again removing the instrument from the Clamp B and delicately clean the tool sensor with a gentle compressed blow or a microfiber material and then reinstall the tool into the Clamp B and again hit the ‘Go button”. If still the problem continues and your Cricut isn’t detecting the blade then continue to stage 4.
- After completing stage 3, try running a sample test with an essential shape utilizing an alternate versatile framework tool you may have, for example, the Knife Blade, the Rotary Blade, or Scoring Wheel. If the sample test becomes successful then it might be an issue with the drive lodging of the first tool/ instrument and you should contact Member Care through one of the choices underneath for help. In the event that you don’t have another tool to test with, or if the issue continues with numerous devices, continue to the final stage 5.
- When all of your tries fail, don’t lose hope because there’s still one last option left to fix your Cricut blade if it’s not detecting and that is to uninstall Design Space. Restart the PC and reboot the Cricut Maker machine. At that point reinstall Design Space and endeavor your project once more. In the event that the issue continues contact Member Care through their website or contact number provided on their website.
How Do I Change the Blade In My Cricut Machine?
Blades are known to be an essential part of any machine like Cricut. Cricut machine blades need to be changed at various spans depending on the materials you use with your machine and also your nature of work. Usually, when the cuts are not fresh, at that point the time has come to change your Cricut’s blade. It would be ideal if you follow the means underneath to change the cutting edge in your Cricut machine:
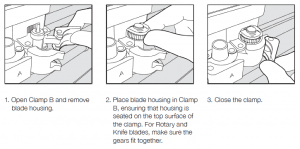
- To start off with changing your Cricut machines blade remove the blade housing from your Cricut machine.
- Cricut Explore or Cricut Maker: Open Clamp B and remove the blade housing from it.
- Inheritance Cricut machines: Then unscrew the dark arm holding the blade housing and remove it.
- For Fine-Point, Premium Fine-Point, Deep The point, and Deep-Cut sharp blades: All you have to do is to gently push the pin on the head of the housing/ lodging and cautiously pull out the blade from the base.
- Now after removing the blade from the housing, remove the protective cover from the new blade.
- After removing the protective cover from your new blade, it is now safe to use. So, insert the new blade into your housing compartment as the magnet present in the housing compartment would hold the blade in place.
- Supplant the blade housing into your machine after placing the blade into it.
- Cricut Explore or Cricut Maker: Place back the housing unit to Clamp B and make sure you close it properly.
- Legacy Cricut machines: For Legacy Cricut machines, you will have to place the blade housing into the black dark arms and then tightly fix the screw
Tips for Installing Cricut Maker Blade
Installing a blade in your Cricut maker requires no science and it really is a piece of cake if you get it right.
- Secured blade housing

It is really significant that your blade housing is situated on the top surface of the Clamp B; if the housing it situated excessively high, your blade won’t contact your material which would eventually lead to rough cuts. See the pictures underneath for certain instances of accurately and incorrectly installed blade housing. - Properly closing the clamp
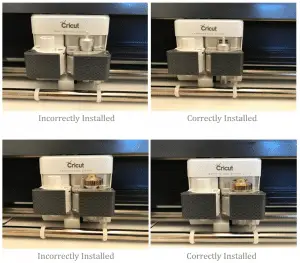
When properly closing the clamp arms around the blade housing, close the left arm first; the left arm has a space that will fit cozily around the blade housing. Holding the left arm set up, swing the other arm around and close the plastic tab. The clamp arms will be secure around the blade housing, and it might require some delicate strain to close the plastic tab; this is ordinary. When the blade housing is appropriately shut, the plastic tabs for clamps A and B will adjust automatically.
FINAL VERDICT
There could be a lot of reasons behind your Cricut Maker not detecting the blade. The initial one is to reinstall the design space after several tries of fixing the blade. Apart from all this, something could’ve gone wrong while installing the blade, so make sure that you install it properly leaving no space behind for mistakes.
Beatrix Ainsley (Bea to her friends) is an abstract artist who was heavily inspired in her twenties by the abstract expressionist movement of the 1940s. Since then Bea has acquired three degrees in Science, Education and most importantly Fine Art. Her art works showcase exploring emotion and introspection of self. To achieve this – the use of bold, sweeping, intricate layers of color, and spontaneity of form is enhanced by reflecting on decades of life experiences. Bea has amassed a vast knowledge of art in all its forms, and hopes to pass it on with her contributions here.